
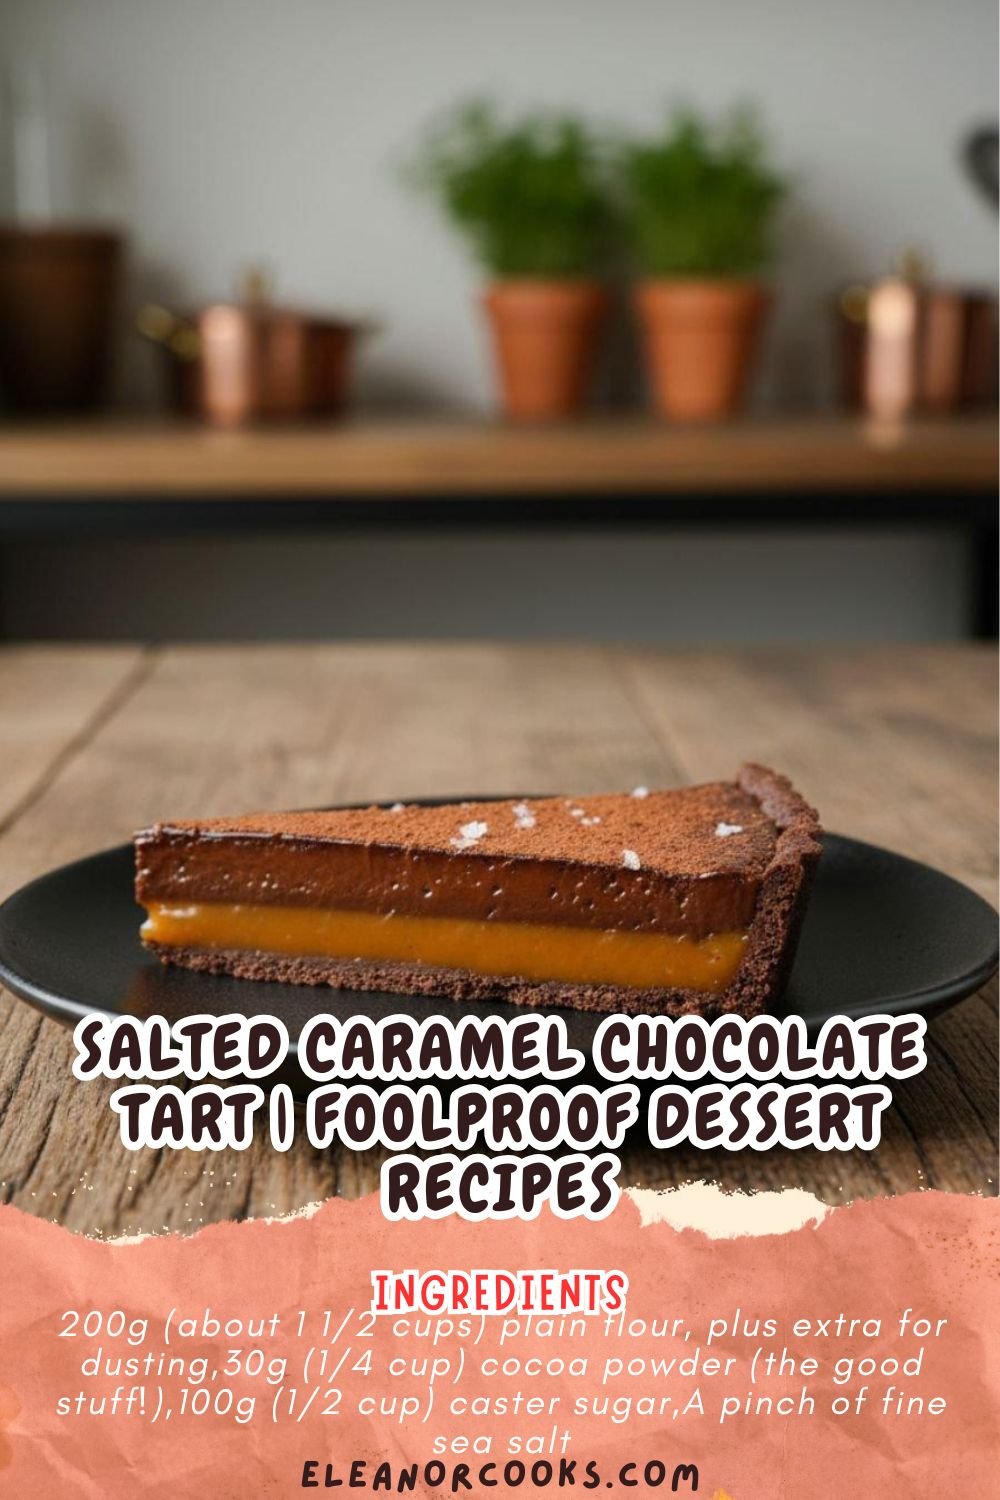
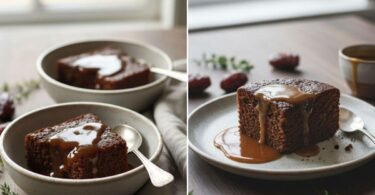
Let me tell you about my obsession with this tart. It started at a friend’s dinner party where I had one bite and shamelessly asked for the recipe right there at the table. The host just laughed and said it came from a fancy bakery. So I did what any reasonable person would do—I spent weeks in my kitchen trying to crack the code. What you’re getting is my hard-won victory. A buttery shortbread crust that shatters just so, a layer of salted caramel that’s just shy of illegal, all topped with a dark chocolate ganache that’s smoother than my last pickup line. It looks impossibly fancy, but trust me—if I can make this without setting off the smoke alarm, you definitely can. Is it the easiest dessert recipe? No. But is it the most impressive thing you’ll bring to any gathering? Absolutely. People will think you’re a pastry chef. I won’t tell if you don’t.

Table of Contents
- 1) Key Takeaways
- 2) Easy Salted Caramel Chocolate Tart Recipe
- 3) Ingredients for Salted Caramel Chocolate Tart
- 4) How to Make Salted Caramel Chocolate Tart
- 5) Tips for Making Salted Caramel Chocolate Tart
- 6) Making Salted Caramel Chocolate Tart Ahead of Time
- 7) Storing Leftover Salted Caramel Chocolate Tart
- 8) Try these Desserts next!
- 9) Salted Caramel Chocolate Tart
- 10) Nutrition
1) Key Takeaways
- What’s the secret to a non-soggy crust?
- How do you keep caramel from becoming a rock?
- Can you really make a tart that looks this good?
- What’s the one thing that takes this from good to ‘wow’?
2) Easy Salted Caramel Chocolate Tart Recipe
Okay, let’s be real from the start. This isn’t a dump-and-stir recipe. Good dessert recipes rarely are. But is it easy? For what it is—a show-stopping tart that’ll make people think you went to pastry school—it’s surprisingly straightforward. The steps are simple. They just require a bit of patience, mostly waiting for things to cool. I promise, the payoff is worth every minute of restraint.

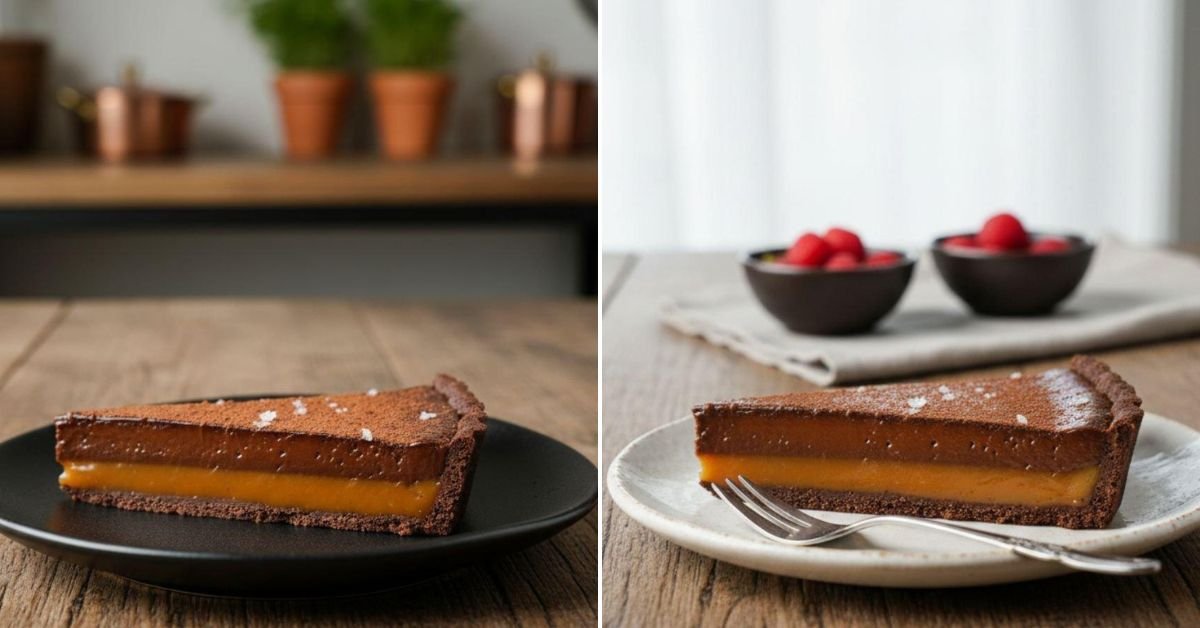
What makes it work is building in layers. You start with a foolproof chocolate shortbread that bakes up crisp. Then you pour in a salted caramel that’s just sweet enough, just salty enough. Finally, you cap it all with a dark chocolate ganache that sets to a perfect, glossy finish. Each layer supports the next. The result? Dessert recipes that look like they came from a boutique bakery, but with your fingerprints (maybe literally) all over them.

I learned this recipe the messy way, through trial and plenty of error. My first caramel seized into a sugary hockey puck. My second crust shrank to a sad little saucer. But you get to skip all that. What you have here is the cleaned-up, foolproof version. It’s my most requested recipe, the one I bring when I need to impress. It never fails. These dessert recipes become your secret weapon.
3) Ingredients for Salted Caramel Chocolate Tart
For the Chocolate Shortbread Crust: You need plain flour and good cocoa powder—don’t skimp here, it’s the foundation. Caster sugar blends in smoother than granulated. A pinch of fine sea salt balances the sweetness. Cold, cubed unsalted butter and one egg yolk bring it all together into a rich, crumbly dough. Easy chocolate dessert recipes start with a solid base.
For the Salted Caramel Layer: Granulated sugar is your only sweetener here; it melts down into that classic amber liquid. Unsalted butter, cubed and at room temp, gets whisked in to create that silky texture. Double cream (heavy cream in the US) is non-negotiable—its high fat content prevents the caramel from seizing. Flaky sea salt, like Maldon, gives you those perfect little salty bursts. This is one of those side dish recipes easy to mess up, but we won’t let that happen.
For the Dark Chocolate Ganache: Use a dark chocolate bar around 70% cocoa, finely chopped. This isn’t the time for chips; they have stabilizers that can mess with the texture. More double cream gets heated and poured over the chocolate to melt it into a lush, pourable glaze. A tiny extra pinch of salt wakes up all the chocolate flavor. This final layer is what makes the whole thing look so professionally finished.
4) How to Make Salted Caramel Chocolate Tart
Step 1. Make and Bake the Crust. Whisk your dry stuff in a big bowl. Rub the cold butter in with your fingertips until it looks like wet sand. Mix in the egg yolk just until a dough forms. Press this evenly into a 9-inch tart pan with a removable bottom. Freeze it solid for 30 minutes—this is the magic trick to prevent shrinking. Bake it blind with weights, then without, until it looks dry. Let it cool completely. This step is all about patience.
Step 2. Conquer the Caramel. This is the part that intimidates everyone. Just remember: don’t stir the sugar. Put it in a heavy-bottomed pan over medium heat and let it melt. Swirl the pan gently if needed. When it’s a deep amber color, take it off the heat. Whisk in the room-temperature butter—it’ll bubble up fiercely. Once that’s smooth, slowly stream in the warm cream, whisking constantly. Finish with the flaky salt. Let this cool until just warm, then pour it into your cooled crust. Chill it for at least an hour to set firm.
Step 3. Finish with the Ganache. Place your chopped chocolate in a bowl. Heat the cream until it just simmers, then pour it over the chocolate. Let it sit for two full minutes. Add a pinch of salt, then whisk gently from the center out until you have a smooth, glossy pool. Pour this over the set caramel. Tap the pan gently on the counter to release bubbles and level the top. Let it set at room temp for an hour, then refrigerate for at least four hours, or ideally overnight. The wait is the final, hardest ingredient.
5) Tips for Making Salted Caramel Chocolate Tart
Use room-temperature ingredients for the caramel. I can’t stress this enough. If your cream or butter is cold, it will shock the molten sugar and cause it to harden into a solid, unusable lump. It’s heartbreaking. Take everything out of the fridge an hour before you start. Warm the cream slightly if you forget. It makes all the difference between silky sauce and a science experiment gone wrong.
Don’t rush the cooling phases. I know, I know. You want to eat it. But if you pour warm caramel into a warm crust, you get a soggy bottom. If you pour ganache onto warm caramel, the layers bleed together. Let each component cool completely before adding the next. Set a timer, do some laundry, watch an episode of something. The structure of the tart depends on these firm, distinct layers. It’s what elevates it from a messy pudding to an elegant slice.
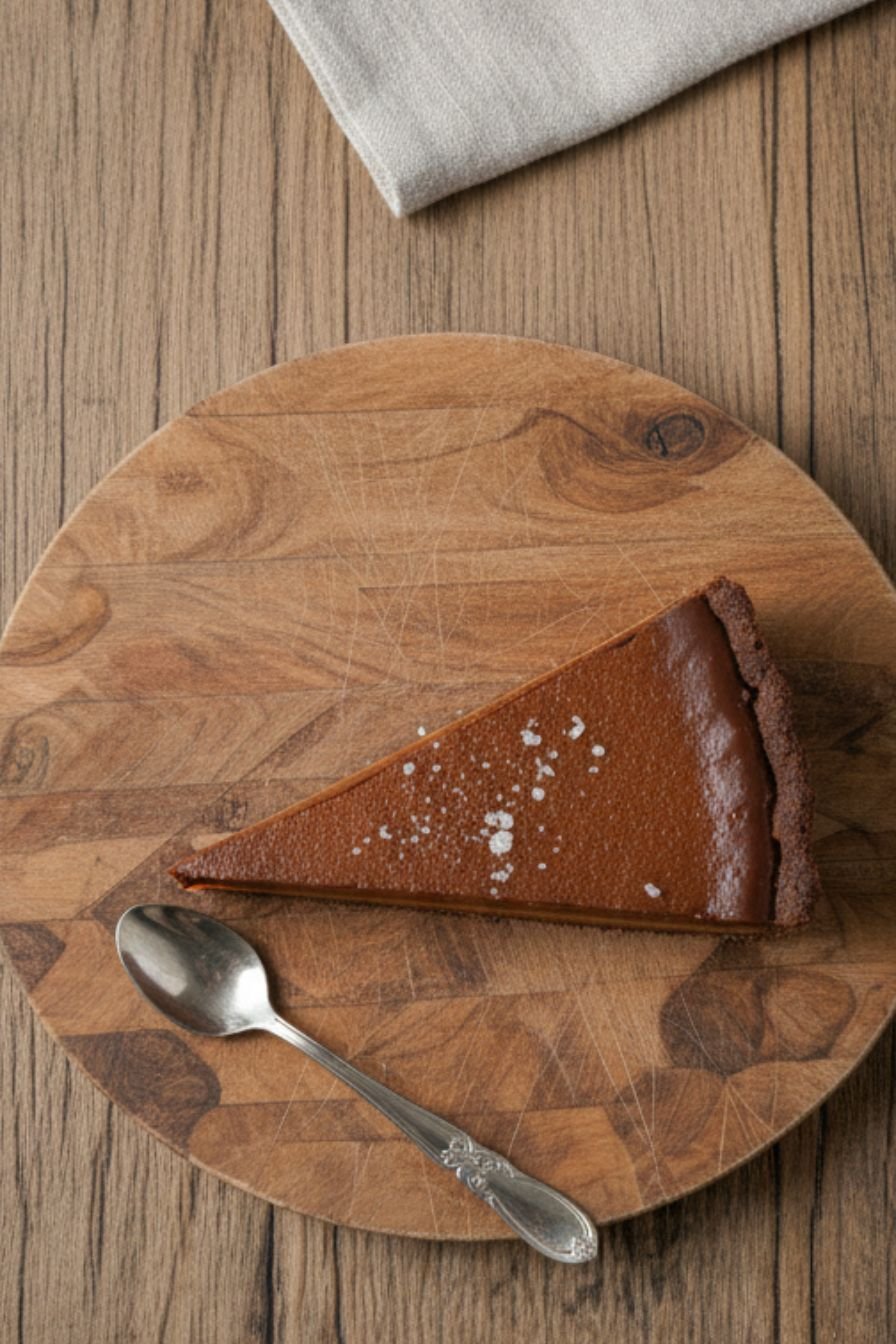
Slice it like a pro. Run a long, sharp knife under hot water for 10 seconds. Dry it completely. Make one clean, confident cut straight down. Wipe the blade clean and reheat it for each slice. This keeps the layers neat and the presentation perfect. No one needs to know how simple the trick is. It’s one of those little details in recipes by ingredients that makes a big visual impact.
6) Making Salted Caramel Chocolate Tart Ahead of Time
This tart is actually better made ahead. In fact, I insist on it. The flavors meld and deepen overnight in the fridge. The ganache sets to the perfect firm-yet-creamy texture. It slices cleaner after a full 24 hours. I always make mine the day before I need it. It takes the pressure off and guarantees a better result. Think of the refrigeration time not as waiting, but as the final, silent step in the recipe.
You can break the work into stages, too. The baked crust, once cooled, can sit wrapped at room temperature for a day. The caramel, once made and cooled, can hang out in a jar in the fridge for up to a week—just warm it gently to pouring consistency. Assemble the whole thing when you have a free afternoon. It’s a fantastic strategy for stress-free entertaining.
Just remember to add the final sprinkle of flaky salt right before you serve. If you do it too early, the salt crystals can dissolve into the ganache from the moisture in the fridge. You want that bright, crunchy, salty pop to hit the tongue at the very end. It’s the signature finish.
7) Storing Leftover Salted Caramel Chocolate Tart
Leftovers? An optimistic concept. But if you do have a slice or two that miraculously survives, cover the cut edges with a piece of parchment paper pressed directly against the tart. Then wrap the whole pan tightly in plastic wrap. It will keep beautifully in the refrigerator for up to 5 days. The crust may soften slightly at the caramel interface after a few days, but it’s still delicious. Think of it as a feature, not a bug—more of a luxurious candy bar texture.
Do not freeze it. I’ve tried. The ganache weeps and gets grainy when it thaws. The caramel can become unpleasantly hard. The delicate textures we worked so hard for just don’t survive the deep freeze. This is a treat best enjoyed fresh within the week. Consider it motivation to share with neighbors or coworkers. They’ll be your friends for life.
If the top loses its shine in the fridge (condensation), you can gently buff it with the softest side of a paper towel just before serving. It’ll bring back that gorgeous gloss. This is a handy trick for all chocolate dessert recipes.
8) Try these Desserts next!

9) Salted Caramel Chocolate Tart

Salted Caramel Chocolate Tart Recipe – Divine Dessert Recipes
Ingredients
For the Shortbread Crust
- 200g (about 1 1/2 cups) plain flour, plus extra for dusting
- 30g (1/4 cup) cocoa powder (the good stuff!)
- 100g (1/2 cup) caster sugar
- A pinch of fine sea salt
- 150g (2/3 cup) cold unsalted butter, cubed
- 1 large egg yolk
For the Salted Caramel
- 200g (1 cup) granulated sugar
- 90g (6 tbsp) unsalted butter, room temp and cubed
- 120ml (1/2 cup) double cream (at least 35% fat, please)
- 1 1/2 tsp flaky sea salt (like Maldon), plus more for finishing
For the Chocolate Ganache
- 200g (7 oz) dark chocolate (70% works best), finely chopped
- 240ml (1 cup) double cream
- A pinch of salt
Instructions
Make the Crust
- Whisk the flour, cocoa, sugar, and salt in a big bowl. Toss in the cold butter cubes.
- Get your hands in there! Rub the butter into the flour until it looks like damp sand. You want no big lumps.
- Mix in the egg yolk until it just comes together into a dough. Don’t overwork it—just enough so it holds when you squeeze it.
- Press the dough into a 23cm loose-bottomed tart tin. Make sure it goes up the sides evenly. Prick the base all over with a fork. Pop it in the freezer for 30 minutes. This stops it shrinking!
- Preheat your oven to 180°C (350°F).
- Bake the frozen crust blind for 20 minutes. Then remove the weights and bake for another 8-10 minutes until it looks dry. Let it cool completely in the tin.
Make the Caramel
- This is the scary part. Don’t be scared. Put the sugar in a medium, heavy-bottomed saucepan over medium heat.
- Let it melt. Don’t stir! Just swirl the pan gently if you see spots melting faster. It’ll go from sugar to amber liquid in about 5-8 minutes.
- Once it’s a deep amber color, take it off the heat. Carefully whisk in the butter—it will bubble up like crazy! Just keep whisking until it’s all melted in.
- Slowly pour in the cream, whisking constantly. It’ll bubble again. That’s fine.
- Whisk in the flaky salt. Let this glorious sauce cool for about 20 minutes, then pour it into your cooled crust. Smooth it out and chill for at least an hour to set.
Make the Ganache & Finish
- Place your chopped chocolate in a heatproof bowl.
- Heat the cream in a small saucepan until it just starts to simmer around the edges. Pour it over the chocolate.
- Let it sit for 2 minutes, then add a pinch of salt and whisk gently from the center out until it’s smooth and glossy.
- Pour the ganache over the set caramel layer. Give the tin a gentle tap on the counter to level it.
- Let it set at room temperature for an hour, then transfer to the fridge for at least 4 hours, or overnight (the hardest wait of all).
- Before serving, sprinkle with a little extra flaky sea salt. Use a warm knife to slice. Prepare for compliments.
10) Nutrition
Serving Size: 1 slice (1/10 of tart), Calories: 520, Sugar: 38g, Sodium: 320mg, Fat: 35g, Saturated Fat: 21g, Carbohydrates: 48g, Fiber: 3g, Protein: 5g, Cholesterol: 95mg


Leave a Comment