
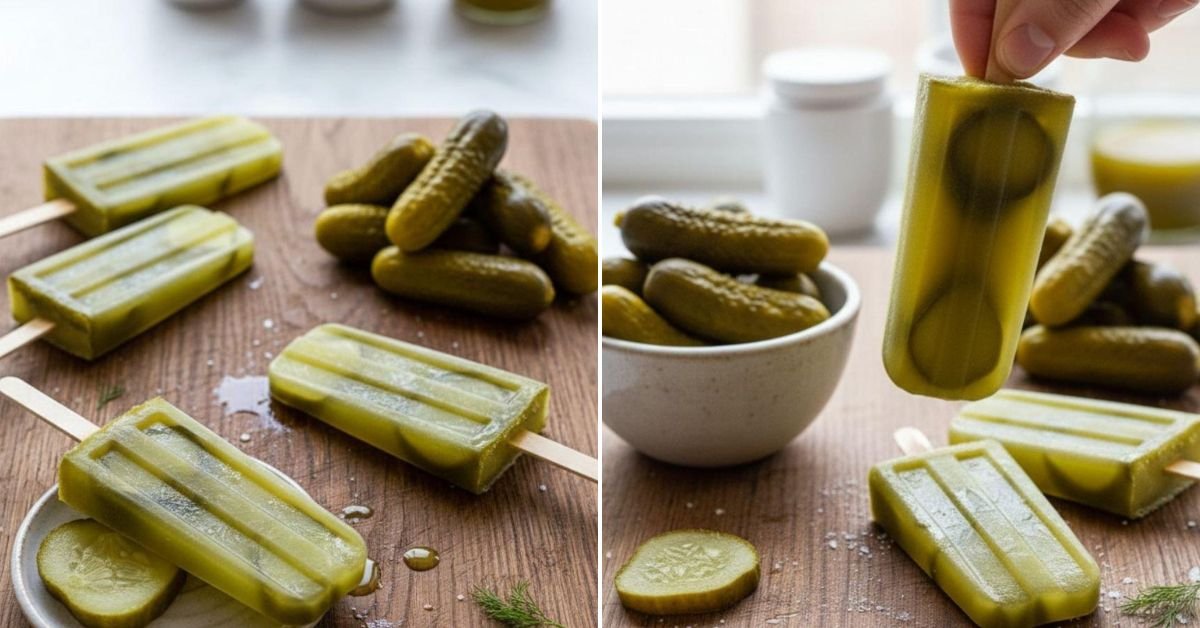
Let’s be honest. My summer experiments have led me down some truly bizarre paths. I’ve attempted a pickle cake that my family still teases me about, and let’s not discuss the time I tried to make 4th of july cake pops with red, white, and brine—that was a soggy disaster. But these pickle pops? They’re the glorious exception. They’re my go-to dill pickle recipe, perfected after I decided to freeze the leftover pickle juice from my infamous pickle fries and my experimental pickle margarita. They are the cool, savory-sweet treat (think bread and butter pickle recipe vibes, but frozen) that actually works. Forget everything you think you know about weird food. These are the most refreshing, salty-sweet little bites for a scorching day.

Table of Contents
- 1) Key Takeaways
- 2) Easy Salty & Sweet Pickle Pops Recipe
- 3) Ingredients for Salty & Sweet Pickle Pops
- 4) How to Make Salty & Sweet Pickle Pops
- 5) Tips for Making Salty & Sweet Pickle Pops
- 6) Making Salty & Sweet Pickle Pops Ahead of Time
- 7) Storing Leftover Pickle Pops
- 8) Try these Dessert/Snack next!
- 9) Salty & Sweet Pickle Pops
- 10) Nutrition
1) Key Takeaways
- What are pickle pops, anyway? They’re frozen pickle juice on a stick, and they’re weirdly wonderful.
- Why add sugar to pickle juice? It cuts the sharp vinegar and creates a perfect salty-sweet balance.
- Can I make these without a fancy mold? Absolutely. An ice cube tray and toothpicks work great.
- Are these actually good? I doubted it too, but the crunch of the frozen pickle handle with the savory-sweet pop is a total game-changer for hot days.
2) Easy Salty & Sweet Pickle Pops Recipe
Look, I get it. The phrase “pickle pop” might make you raise an eyebrow. It did the same to me the first time I saw the idea online, tucked between a pickle cake and a recipe for 4th of july cake pops. I’ve made my share of questionable summer recipes. There was the pickle fries incident of 2019 (greasy) and the infamous pickle margarita that my friends still won’t let me live down. But these pops? They’re the happy accident that came from all those experiments.

This is one of those no-cook summer recipes that feels like a secret. You take something you’d normally pour down the drain—that glorious, garlicky dill pickle juice—and you turn it into the most refreshing treat imaginable. The process is laughably simple, which is why I love it. We’re talking five minutes of active work, mostly just stirring. It’s the perfect project for a lazy afternoon when the sun is beating down and you need something to do besides sweat.

The magic, for me, isn’t just in the taste. It’s in the reaction. Hand one of these to a friend on your deck. Watch their face go from confusion to surprise to pure delight. That’s the real reward. These aren’t just a snack; they’re a conversation starter, a way to beat the heat that’s a little quirky and a lot delicious. They’re my favorite kind of summer recipe: easy, unexpected, and guaranteed to make people smile.

3) Ingredients for Salty & Sweet Pickle Pops
Dill Pickle Juice: This is the star. You’ll need about three cups. I just save the juice from a giant jar of dill pickles after we’ve eaten them all. That juice is packed with flavor—dill, garlic, salt, a bit of tang. If you’re fresh out, don’t worry. I’ve got a quick homemade version in the notes that works in a pinch.
Granulated Sugar: I know, I know. Sugar in pickle juice? Hear me out. A quarter cup is all you need. It doesn’t make the pops sweet like candy; it just rounds out the harsh edges of the vinegar and creates that incredible salty-sweet dynamic. Think of it like a bread and butter pickle recipe, but frozen. It’s the key to making these truly addictive.
Hot Sauce (Optional): This is for the adventurers. A teaspoon of your favorite hot sauce adds a sneaky little kick that creeps up on you after the initial chill. It’s completely optional, but if you like a bit of heat with your cool, give it a try.
Whole Mini Dill Pickles: These aren’t for chopping up. They become the handles! You’ll need one per popicle. Pat them dry with a paper towel so they stick to the stick better. The contrast of biting into the frozen juice around a still-crunchy pickle is honestly the best part.
Popsicle Molds & Sticks: Any small popsicle mold works. If you don’t have any (I lost mine for a solid year), an ice cube tray and toothpicks are a perfect stand-in. You might get smaller bites, but they’re just as fun.
4) How to Make Salty & Sweet Pickle Pops
step 1. Grab a big measuring cup or a pitcher. Pour in your three cups of pickle juice. Now, add the quarter cup of sugar. Whisk it like you mean it until you can’t see any sugar crystals swimming around. Give it a tiny taste. You should get salty first, then a mellow sweet note. If you’re using the hot sauce, whisk that in now too.
step 2. Carefully pour your magical brine into the popsicle molds. Leave a little gap at the top, maybe a quarter inch. The liquid expands as it freezes, and you don’t want a sticky mess in your freezer. I may have learned this the hard way.
step 3. Take your dry mini pickle and gently but firmly push it onto the end of a popsicle stick. You want it secure. Then, slide the stick into the mold so the pickle is fully submerged in the juice. It looks a little funny, like a pickle on a tiny spear, but trust the process. If you’re using an ice cube tray, just pour the juice in and halfway through freezing, poke a toothpick into each cube.
step 4. Pop the whole tray into the freezer. Now, walk away. Seriously, let them be. They need at least 4 to 6 hours to turn solid. I usually make them right after dinner and forget about them until the next afternoon. Overnight is perfect.
step 5. The grand unveiling! To get them out, don’t just yank. Run the outside of the mold under lukewarm water for about 10-15 seconds. They’ll loosen right up and slide out beautifully. Enjoy immediately. That first cold, crunchy, salty-sweet bite is what all these easy summer recipes are about.
5) Tips for Making Salty & Sweet Pickle Pops
Choosing your pickle juice matters. For the best flavor, use juice from genuine garlic dill pickles. The juice from bread and butter pickles will work, but it’ll be much sweeter and lack that savory punch. I avoid the juice from neon-green “sandwich slices” if I can; the flavor can be a bit artificial.
Don’t skip the pat-dry step for the mini pickles. A wet pickle won’t grip the stick well, and you might end up with a pickle sinking to the bottom of the mold and a bare stick. A quick dab with a paper towel makes all the difference. It’s a tiny step that saves a lot of frustration.
Embrace the imperfect pop. If you use an ice cube tray, your pops will be rustic. That’s fine! If a toothpick slips out, just push it back in. If one pop breaks when you unmold it, eat the pieces. Part of the charm of these homemade treats is that they don’t look store-bought. They look like you had a fun, slightly bizarre idea in your kitchen, and that’s exactly right.
6) Making Salty & Sweet Pickle Pops Ahead of Time
This might be the best part about pickle pops as a summer recipe: they are the ultimate make-ahead treat. Once they’re frozen solid, they’ll keep perfectly in the freezer for weeks, if not months. I like to make a double batch at the start of a hot spell. That way, whenever a heat wave hits or kids (or adults) start clamoring for a cold snack, I can just reach into the freezer.
They’re also fantastic for parties. Imagine pulling out a tray of these at a backyard barbecue, right next to the burgers and potato salad. The surprise factor alone is worth it. Just make them at least a day in advance so you’re not stressed. Let the freezer do the work while you relax.
If you’re planning a big event, consider making a few flavor variations. Add a pinch of smoked paprika to one batch for a hint of warmth. Or stir in a tablespoon of fresh chopped dill to another for an extra herby kick. Having a little variety makes your freezer feel like a gourmet popsicle shop.
7) Storing Leftover Pickle Pops
Leftovers? With these, it’s possible but not guaranteed. If you do have any survivors, storing them is simple. Once they’re fully unmolded, you can transfer them to a large zip-top freezer bag or an airtight container. Lay them in a single layer if you can, so they don’t freeze together into one giant pickle-pop iceberg.
They don’t suffer from freezer burn easily because of their high salt and sugar content, but for the best texture, try to eat them within a month or two. Honestly, they never last that long in my house. They’re the first thing my nephew goes for when he visits.
A quick note on texture: If they sit in the freezer for a long time, they might develop very tiny ice crystals. This doesn’t affect the flavor at all. Just let them sit on the counter for a minute or two before biting in. It softens the surface just enough for that perfect crunch.
8) Try these Dessert/Snack next!


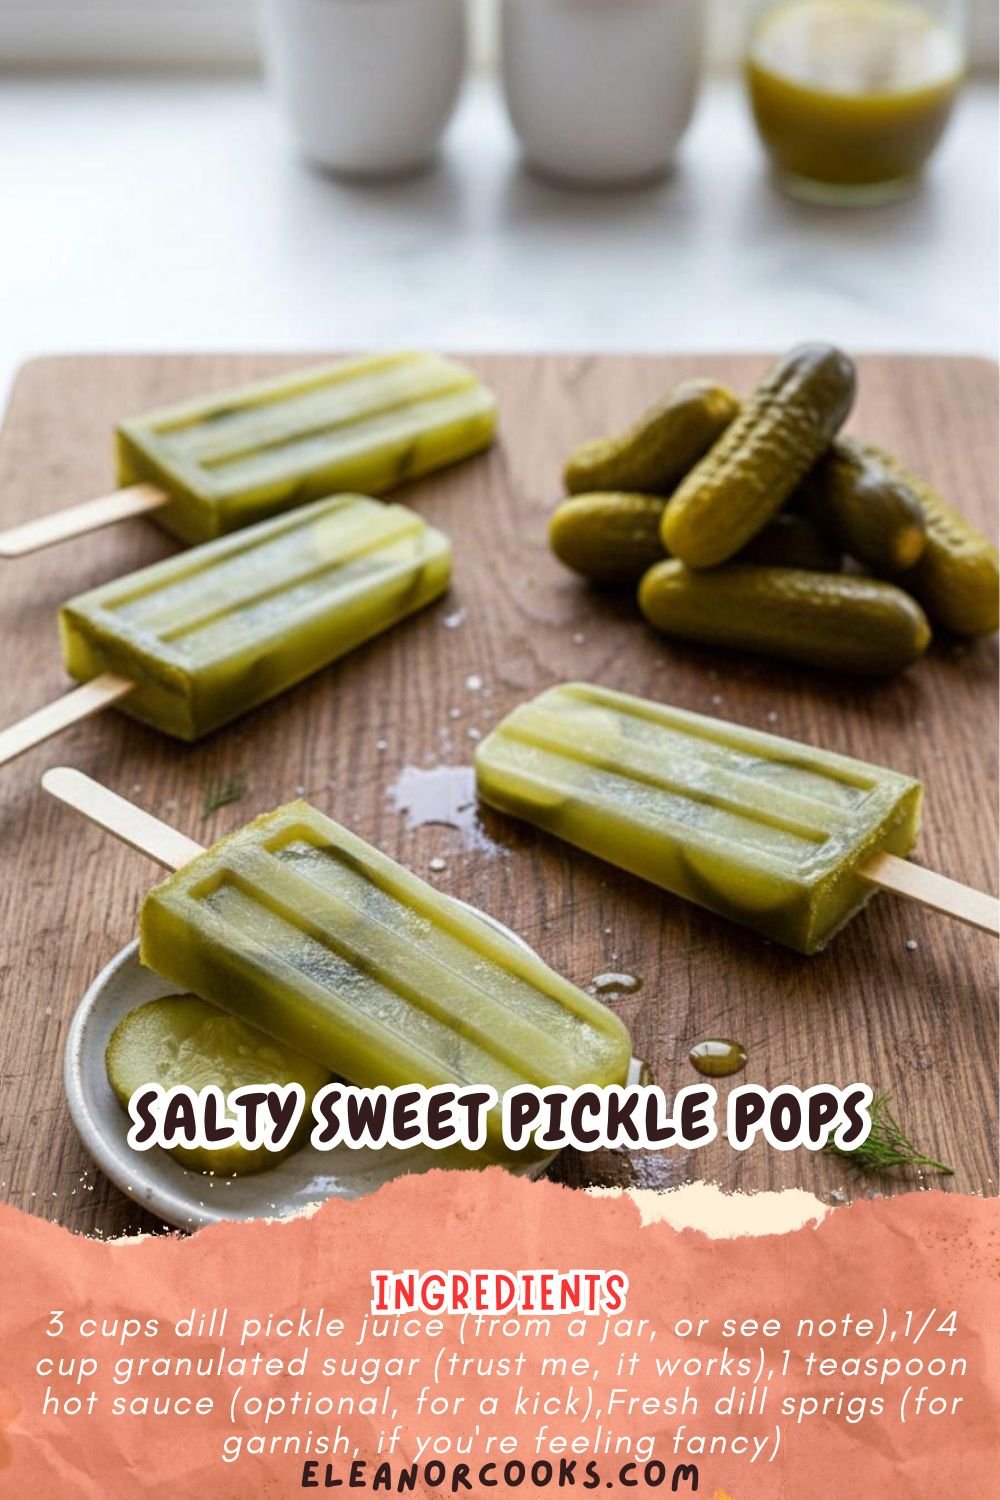
9) Salty & Sweet Pickle Pops

Salty & Sweet Pickle Pops | Easy Summer Recipes
Ingredients
For the Pops
- 3 cups dill pickle juice (from a jar, or see note)
- 1/4 cup granulated sugar (trust me, it works)
- 1 teaspoon hot sauce (optional, for a kick)
- Fresh dill sprigs (for garnish, if you’re feeling fancy)
- Whole mini dill pickles, patted dry (about 10-12, for the stick)
Equipment
- 10-12 small popsicle molds (or an ice cube tray and toothpicks)
- Popsicle sticks
Instructions
- In a pitcher or large measuring cup, whisk together the pickle juice and sugar until the sugar dissolves completely. Give it a taste. You want a nice balance of salty and sweet. Add the hot sauce now if you’re using it.
- Carefully pour the mixture into your popsicle molds, leaving about 1/4 inch of space at the top for expansion.
- Take a whole mini pickle and gently push it onto the end of a popsicle stick. Then, slide the stick into the mold so the pickle is submerged in the juice. The pickle becomes your handle! If you’re using an ice cube tray, just pour the juice in and add a toothpick halfway through freezing.
- Pop the molds into the freezer and let them set solid. This usually takes at least 4-6 hours, but I like to leave them overnight to be sure.
- To unmold, run the outside of the mold under warm water for just a few seconds. They should slide right out. Enjoy immediately for that perfect crunchy-salty-sweet-cold sensation.
10) Nutrition
Serving Size: 1 pop | Calories: ~25 | Sodium: ~480mg | Sugar: 5g | Carbohydrates: 6g | Protein: 0g


Leave a Comment