

Okay, let’s be honest. Some days you don’t want a massive, commitment-level cake. You want something small, bright, and packed with flavor that says, “I made an effort, but I didn’t slave all day.” That’s where these little lemon and pistachio loaves come in. I originally tweaked this recipe to use up leftover yogurt and a bag of pistachios that was haunting my pantry. The result? Pure, zingy sunshine. They’re the perfect pick-me-up with a cup of tea and make you look like a baking genius with minimal fuss. We all have those weeks where dinner is a blur of ‘lemon chicken recipes’—be it an easy lemon chicken, a healthy lemon chicken, lemon butter chicken, or lemon herb chicken. By Friday, you crave something sweet but equally vibrant. This is that something. It uses the same principle of balancing citrus with richness, just in cake form. Consider it the dessert cousin to your savory chicken endeavors. Trust me, after you master these loaves, you’ll feel so accomplished you might even tackle something like ‘how to cut a watermelon’ for a fancy fruit salad pairing. Or maybe you’ll just eat three of these instead. No judgment here.

Table of Contents
- 1) Key Takeaways
- 2) Easy Lemon Pistachio Loaves Recipe
- 3) Ingredients for Lemon Pistachio Loaves
- 4) How to Make Lemon Pistachio Loaves
- 5) Tips for Making Lemon Pistachio Loaves
- 6) Making Lemon Pistachio Loaves Ahead of Time
- 7) Storing Leftover Loaves
- 8) Try these Dessert next!
- 9) Lemon Pistachio Loaves
- 10) Nutrition
1) Key Takeaways
What are the key characteristics of a perfect tea loaf? It should be incredibly moist, have a bright burst of citrus flavor that doesn’t hide, and offer a satisfying texture beyond just soft cake. These loaves recipes achieve all that with yogurt for tangy moisture and pistachios for a delightful, gentle crunch.

What’s the one ingredient you should never skip in a lemon cake? The zest. That’s where the real perfume lives. I’ve tried shortcuts and regretted it every single time. Fresh lemon zest makes these little loaves taste like bottled sunshine.
How do you prevent dense, gummy mini loaves? Room temperature ingredients are your best friend, and don’t overmix the batter once you add the flour. A few streaks are perfectly fine—they’ll bake out, I promise. Overmixing is the quickest way to tough cake.

Can this recipe be adapted? Absolutely. No mini loaf pan? A muffin tin is a perfect substitute. Out of pistachios? Try almonds or even a mix of seeds. The basic formula of these simple loaf cakes is wonderfully forgiving.
2) Easy Lemon Pistachio Loaves Recipe
Let me tell you about the little loaf that changed my week. I was in one of those moods where the thought of washing a mountain of mixing bowls felt like climbing Everest. But I also craved something baked, something that felt like a proper treat. That’s the beauty of this recipe. It uses one bowl for the wet ingredients, one for the dry, and your pan. The cleanup is almost as satisfying as the first bite.
The process itself is a gentle rhythm, not a frantic race. Cream butter and sugar until it’s pale and fluffy—this isn’t just busywork, it creates the airy structure of the cake. Fold in the dry ingredients with a light hand. The whole thing feels more like a calming kitchen ritual than a chore. Before you know it, your house smells like a lemon grove and you have a row of golden-topped beauties cooling on the rack.
These loaves strike a perfect balance. They’re special enough for a weekend brunch or to package up for a friend who needs a pick-me-up, yet simple enough for a Wednesday evening when you just want a sliver of something sweet with your tea. They prove that impressive loaves recipes don’t require a pastry degree or a full afternoon.
3) Ingredients for Lemon Pistachio Loaves
Unsalted Butter: Softened butter is non-negotiable here. If it’s rock hard, you’ll have a lumpy mess. If it’s melted, you’ll lose that crucial airiness. I leave mine on the counter for an hour, or if I forget (which is often), I gently microwave it for 5-second bursts. You want it soft enough that your finger leaves a clear indent.
Granulated Sugar & Large Eggs: Standard pantry heroes. Using room-temperature eggs is a tiny step with a big payoff—they emulsify into the butter and sugar mixture much more smoothly, giving you a uniform, velvety batter. A cold egg can make the mixture look curdled, which isn’t the end of the world, but room temp keeps things happy.
Lemons: You’ll need two good, juicy ones. We’re using both the zest and the juice. The zest is the flavor powerhouse, packed with aromatic oils. The juice goes into the tangy glaze that seals the deal. Please, for the love of all things citrus, use fresh lemons. The bottled stuff just can’t compete.
Plain Full-Fat Yogurt or Sour Cream: This is the secret to an unbelievably moist crumb. The acidity also tenderizes the gluten, making the cake soft. I usually use yogurt because I always have it, but sour cream gives an even richer tang. Either works beautifully.
All-Purpose Flour, Baking Powder, & Salt: The supporting cast. I give my flour a quick whisk with the baking powder and salt right in the measuring cup before adding it. This little trick helps distribute the leavener so you don’t get any bitter pockets.
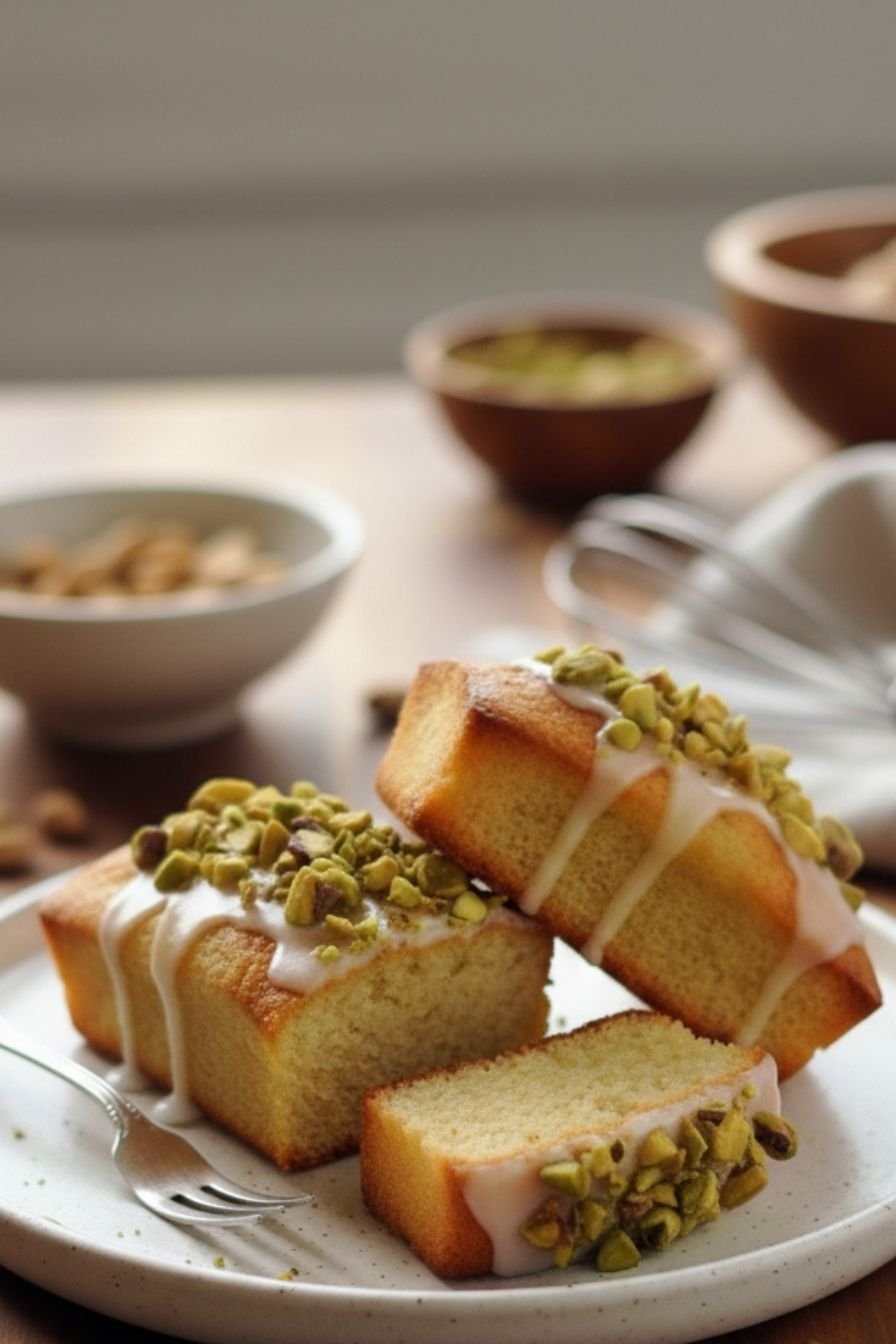
Shelled Pistachios: Look for raw, unsalted pistachios. You’ll chop most of them to fold into the batter, saving a small handful for a pretty, crunchy garnish on top of the glaze. Their subtle, almost floral nuttiness is the perfect partner for the sharp lemon.
4) How to Make Lemon Pistachio Loaves
Step 1: Prep and Mix the Wet Goods. Heat your oven to 350°F (175°C). Grease your mini loaf pan really, really well. I use softened butter and a pastry brush, getting into every corner. In a large bowl, beat the softened butter and sugar together for a solid 2-3 minutes. You want it light and almost fluffy. Scrape down the sides. Beat in the eggs, one at a time, waiting until each is fully incorporated. Mix in the lemon zest and yogurt. It might look a bit separated, but that’s okay.
Step 2: Bring in the Dry Ingredients. In a separate bowl, whisk together the flour, baking powder, and salt. Add this all at once to the wet mixture. Use a spatula or wooden spoon and mix gently. Stop the moment you no longer see dry flour. A few streaks are totally fine—overmixing is the enemy of tenderness. Gently fold in the chopped pistachios.
Step 3: Bake and Cool with Patience. Divide the batter evenly among your prepared loaf cavities. They should be about two-thirds full. Bake for 25 to 30 minutes. Start checking at 25 minutes—a toothpick inserted into the center should come out clean or with a few moist crumbs. Let the loaves cool in the pan for a full 10 minutes. Then, run a knife around the edges and carefully turn them out onto a wire rack to cool completely. This cooling step is critical for the glaze to set properly.
Step 4: The Glaze and Final Flourish. While the loaves cool, make the glaze. Sift your powdered sugar into a bowl if you can be bothered (it prevents lumps). Whisk in 2 tablespoons of the fresh lemon juice and a tiny pinch of salt. You want a thick but pourable consistency—like heavy cream. Add more lemon juice a teaspoon at a time if needed. Once the loaves are completely cool, drizzle the glaze generously over the tops. Immediately sprinkle with the reserved chopped pistachios. Let the glaze set for about 15 minutes before slicing.
5) Tips for Making Lemon Pistachio Loaves
Zesting lemons is easier with a microplane, but if you don’t have one, the fine side of a box grater works. Just be careful to only get the bright yellow zest, not the bitter white pith underneath. I zest my lemons directly over the bowl with the butter and sugar—those precious oils will fall right in. Speaking of tools, a good flexible spatula is worth its weight in gold for folding and scraping every last bit of batter.
Oven temperatures can be liars. Mine runs a little hot, so I often drop it to 340°F. If you’ve never checked yours with an oven thermometer, it’s a game-changer for baking. The loaves are done when they’re golden on top, the edges are just starting to pull away from the pan, and that toothpick test comes back clean. They’ll continue to cook a bit from residual heat as they cool in the pan.
Don’t rush the cooling. I know it’s tempting to slather on the glaze while they’re warm, but it’ll just melt into a sad, translucent sheet and soak into the cake. Waiting for them to cool completely gives you that beautiful, opaque, crackly glaze that looks professional. If you’re impatient, pop them in the fridge for 20 minutes after their initial cool on the rack.
6) Making Lemon Pistachio Loaves Ahead of Time
These little loaves are a baker’s dream for getting ahead. You have a few great options. You can bake them completely, let them cool, and store them unglazed in an airtight container at room temperature for up to two days. The day you plan to serve them, just whip up the quick glaze and finish them off. This keeps the pistachio topping perfectly crunchy.
Alternatively, you can prepare the batter a day in advance. Mix everything up, cover the bowl tightly with plastic wrap, and stash it in the fridge overnight. The next morning, let the batter sit on the counter for about 30 minutes to take the chill off, give it one gentle stir, then portion and bake. The cold rest can actually improve the flavor.
For longer-term storage, baked and cooled loaves (again, unglazed) freeze beautifully. Wrap each one individually in plastic wrap, then place them all in a heavy-duty freezer bag. They’ll keep for up to two months. Thaw overnight in the fridge or at room temperature for a few hours before glazing and serving.
7) Storing Leftover Loaves
Once glazed, store any leftovers (ha, as if!) in a single layer in an airtight container. I use a cake carrier or a large tupperware. You can place a sheet of parchment between layers if you must stack them, but try to avoid it to protect the glaze. They’ll keep at room temperature for about two days. The moisture from the yogurt means they stay soft.
After a couple of days, if they’re still around, pop the container in the refrigerator. They’ll last for up to five days total. The cold will firm up the texture a bit, so I like to let a refrigerated slice come to room temperature for 15 minutes before eating. It brings back that perfect tender crumb.
Can you freeze glazed loaves? You can, but the glaze might get a little weepy when it thaws. It’ll still taste great, but the presentation won’t be as perfect. For best results, freeze them unglazed and add the glaze after thawing, as mentioned above.
8) Try these Dessert next!
9) Lemon Pistachio Loaves

Tiny Lemon & Pistachio Loaves | Irresistible Loaves Recipes
Ingredients
For the Loaves
- 1/2 cup (113g) unsalted butter, softened (plus a bit more for greasing)
- 3/4 cup (150g) granulated sugar
- 2 large eggs, at room temperature (trust me, it matters)
- Zest of 2 large lemons (save the juice for the glaze!)
- 1/2 cup (120g) plain full-fat yogurt or sour cream
- 1 1/2 cups (190g) all-purpose flour
- 1 1/2 tsp baking powder
- 1/4 tsp salt
- 1/2 cup (60g) shelled pistachios, roughly chopped (plus a handful extra for topping)
For the Lemon Glaze
- 1 cup (120g) powdered sugar, sifted (if you can be bothered)
- 2-3 tbsp fresh lemon juice (from the zested lemons!)
- A tiny pinch of salt
Instructions
Make the Batter
- First, preheat your oven to 350°F (175°C). Grease a mini loaf pan (usually holds 4-6 little loaves) really well with butter. Don’t skimp, or you’ll be chiseling.
- In a big bowl, beat the softened butter and sugar together for a good 2-3 minutes until it looks pale and fluffy. This isn’t the step to rush.
- Beat in the eggs, one at a time, making sure each is fully mixed in before adding the next. Then, mix in the lemon zest and yogurt. It might look a bit curdled, but that’s fine.
- In a separate bowl, whisk together the flour, baking powder, and salt. Add this to the wet ingredients and mix gently, just until you don’t see dry flour anymore. A few streaks are okay. Fold in the chopped pistachios.
Bake & Cool
- Divide the batter evenly among your prepared mini loaf cavities. They should be about 2/3 full.
- Bake for 25-30 minutes. You’ll know they’re done when a toothpick poked into the center comes out clean, or with just a crumb or two.
- Let the loaves cool in the pan for about 10 minutes. Then, carefully turn them out onto a wire rack to cool completely. Patience is a virtue here—if you glaze them while warm, it’ll just melt into a puddle.
Glaze & Serve
- For the glaze, whisk the powdered sugar, 2 tablespoons of lemon juice, and the salt together. You want a thick but pourable consistency. Add the extra tablespoon of lemon juice a teaspoon at a time if it’s too thick.
- Once the loaves are completely cool, drizzle the glaze generously over the top. Immediately sprinkle with the reserved handful of chopped pistachios for a pretty finish and extra crunch.
- Let the glaze set for about 15 minutes before serving. Or, you know, just eat one immediately. I won’t tell.
10) Nutrition
Serving Size: 1 mini loaf | Calories: approx 320 | Sugar: 28g | Sodium: 150mg | Fat: 16g | Saturated Fat: 8g | Carbohydrates: 42g | Fiber: 1g | Protein: 5g | Cholesterol: 70mg


Leave a Comment