
Okay, I have a confession. I once served this cake at a dinner party and a guest literally stopped mid-sentence, fork frozen in air, to ask for the recipe. That’s the power of three different kinds of chocolate mousse stacked into one ridiculously elegant, yet secretly simple, cake. Let’s be real. It looks like you slaved for hours. I won’t tell if you don’t. The trick is building it in layers, and giving each mousse a few minutes to set up before adding the next. No fancy equipment needed beyond a mixer and a springform pan. Honestly, the hardest part is waiting for it to chill. This is my go-to showstopper for birthdays, anniversaries, or any Tuesday that needs a major upgrade. After all, knowing how to make a wedding cake is one thing, but mastering a smash cake for the one-year-old photo shoot? That’s next level. These are the easy recipes to make at home that make people think you’re a pastry chef.
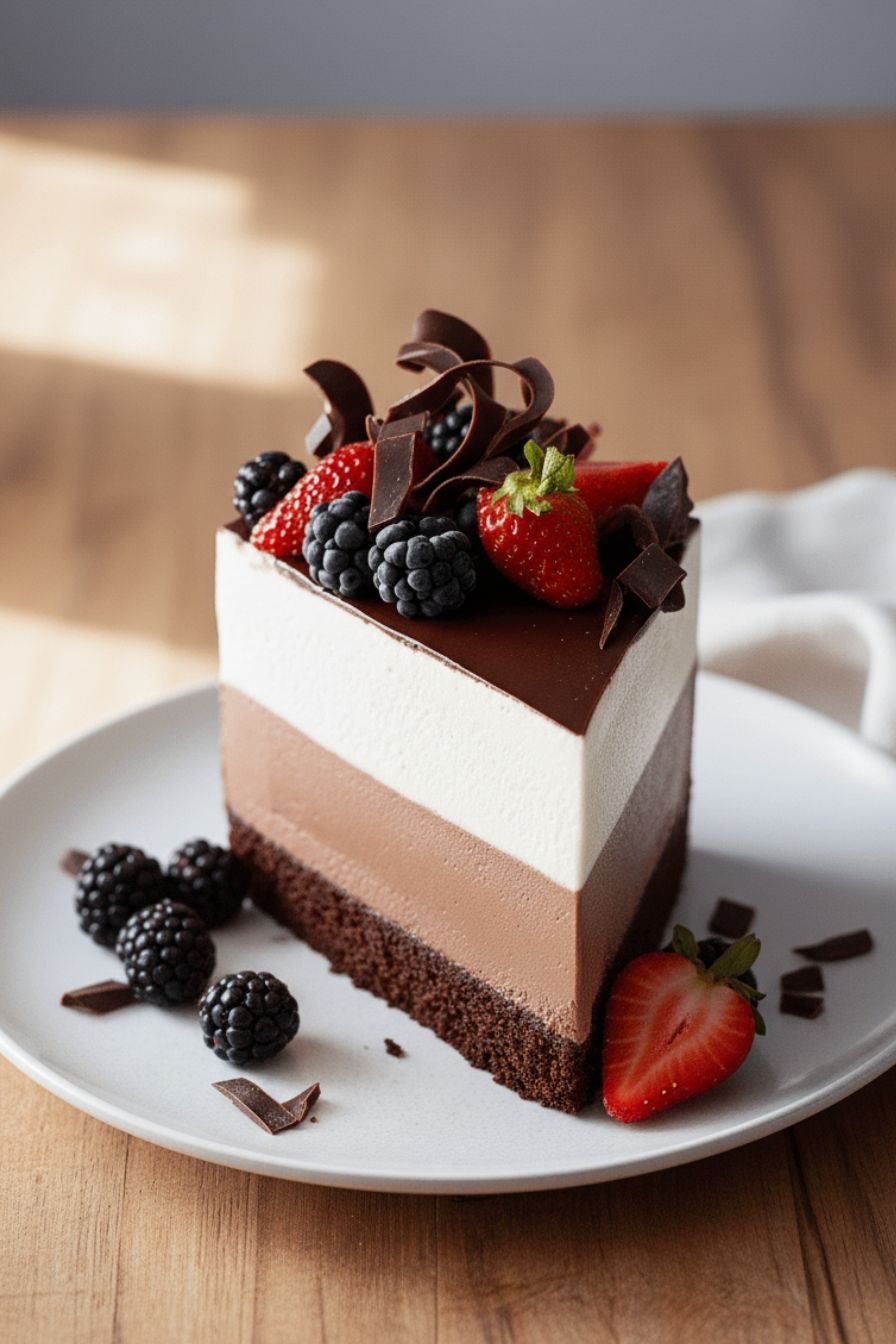
Table of Contents
- 1) Key Takeaways
- 2) Easy Triple Chocolate Mousse Cake Recipe
- 3) Ingredients for Triple Chocolate Mousse Cake
- 4) How to Make Triple Chocolate Mousse Cake
- 5) Tips for Making Triple Chocolate Mousse Cake
- 6) Making Triple Chocolate Mousse Cake Ahead of Time
- 7) Storing Leftover Triple Chocolate Mousse Cake
- 8) Try these Dessert Recipes next!
- 9) Triple Chocolate Mousse Cake
- 10) Nutrition
1) Key Takeaways
- Why is my mousse cake falling apart?
- What is mousse cake made of?
- How long can chocolate mousse cake sit out?
- Should mousse cake be frozen or refrigerated?
These are the things I wondered before I made my first one. The answers? Don’t rush the layers, it’s mostly just chocolate and cream, not for long, and fridge it. This recipe walks you through all of that without a fuss.

2) Easy Triple Chocolate Mousse Cake Recipe
Let’s get this out of the way: yes, you can do this. I remember staring at pictures of layered mousse cakes thinking they were the domain of pastry chefs with magic wands. Then I made one, and the spell was broken. The process is straightforward—melt chocolate, whip cream, fold them together, and repeat. The result, though? Pure magic.

Honestly, the most complicated part is owning a springform pan. Beyond that, it’s about patience, not skill. Letting each layer chill before adding the next is the only real secret. This approach transforms a fancy project into a relaxing, step-by-step afternoon in the kitchen.
I’m always on the hunt for showstopping dessert recipes that don’t require a culinary degree. This cake fits the bill. It impresses at birthdays, feels decadent for anniversaries, and honestly, it makes a regular Tuesday feel like a celebration. It’s one of those easy recipes to make at home that makes you look like you’ve got it all figured out.
3) Ingredients for Triple Chocolate Mousse Cake
For the Chocolate Cake Base: Butter and sugar get creamed together until fluffy. Eggs and vanilla go in next for richness. Buttermilk is my secret for a tender crumb. Then we mix in flour, cocoa powder, baking soda, and a pinch of salt. This base is sturdy enough to hold the mousse but still melts in your mouth. You could use a box mix in a pinch, I promise I won’t tell.
For the Dark Chocolate Mousse: A good dark chocolate, around 60-70%, gives a deep, slightly bitter backbone. Cold heavy cream whips up with a bit of powdered sugar. Melting the chocolate gently is key—nobody wants scorched bitterness. Then you fold the two together with a gentle hand. It’s like making a cloud, but a chocolate one.
For the Milk Chocolate Mousse: This is the crowd-pleaser layer. Milk chocolate melts into a silky smooth base. Again, cold cream gets whipped. The folding process is the same. This layer adds a sweet, creamy contrast that sits perfectly between the dark and white chocolate. Sometimes I think about how to make condensed milk at home for projects like this, but a good bar of milk chocolate works wonders on its own.
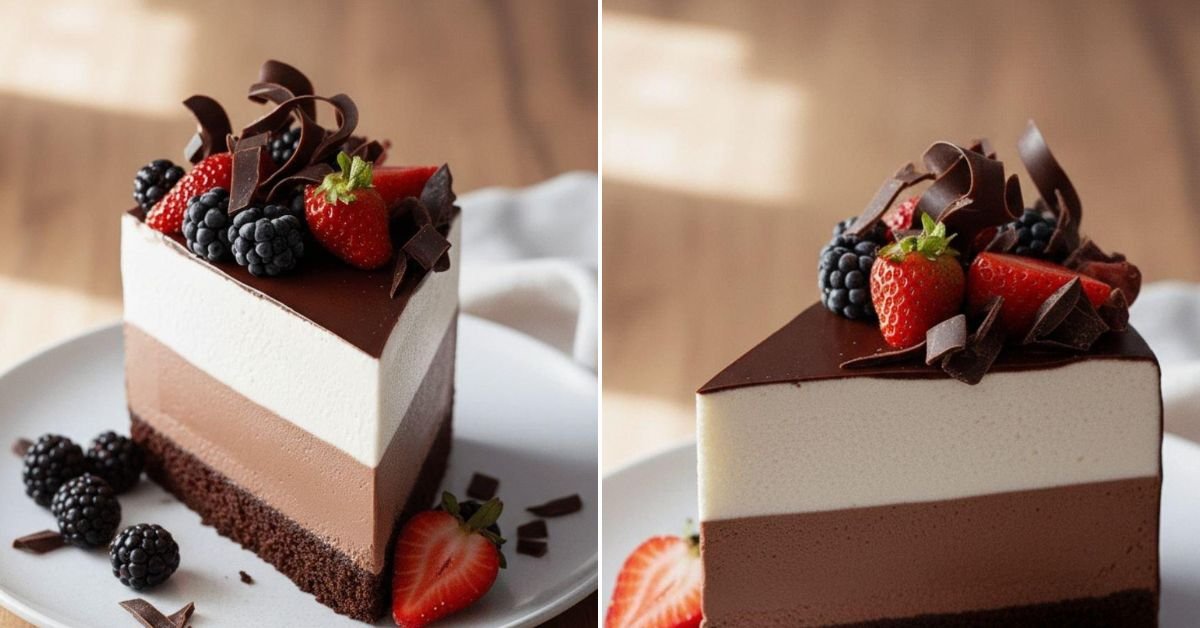
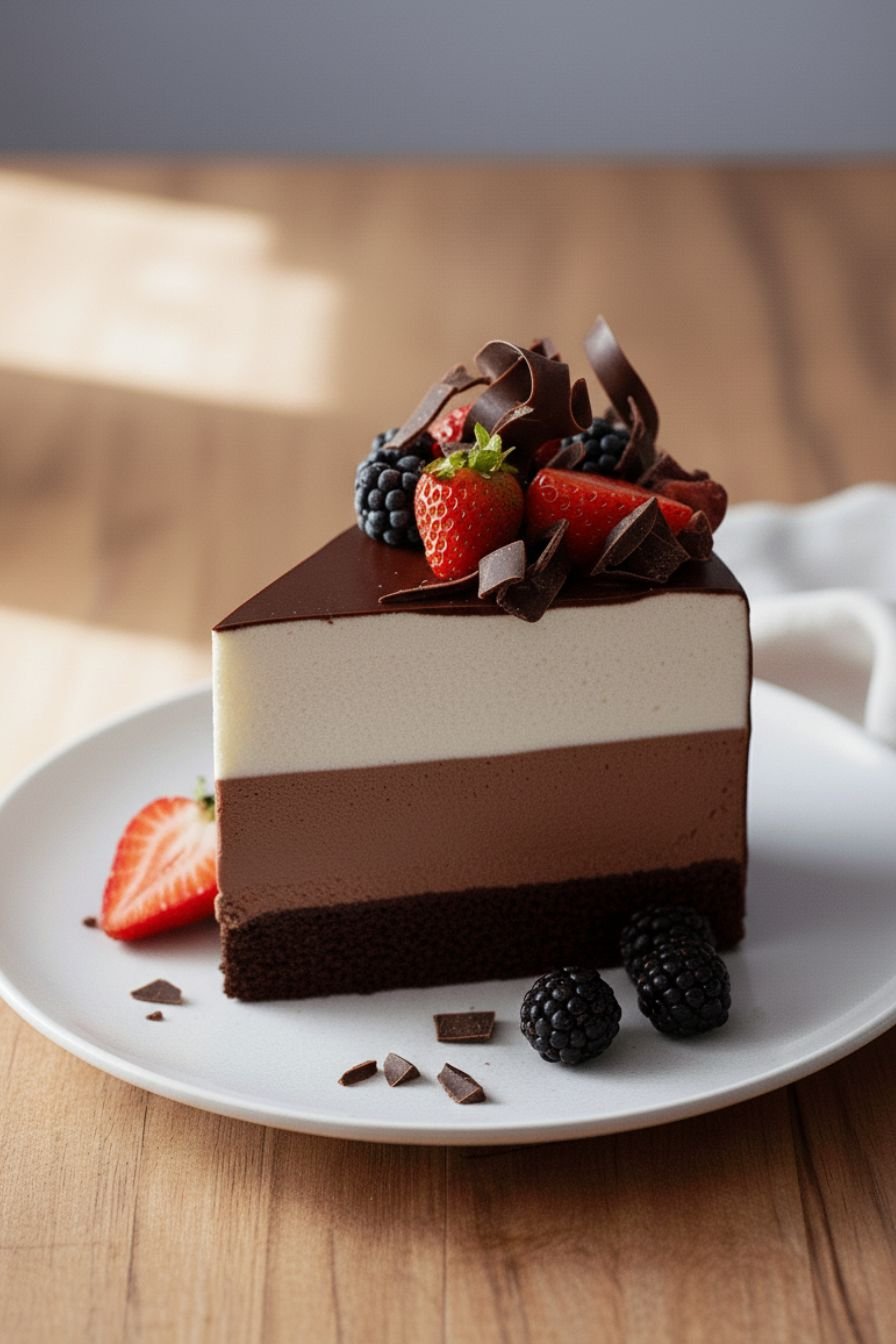
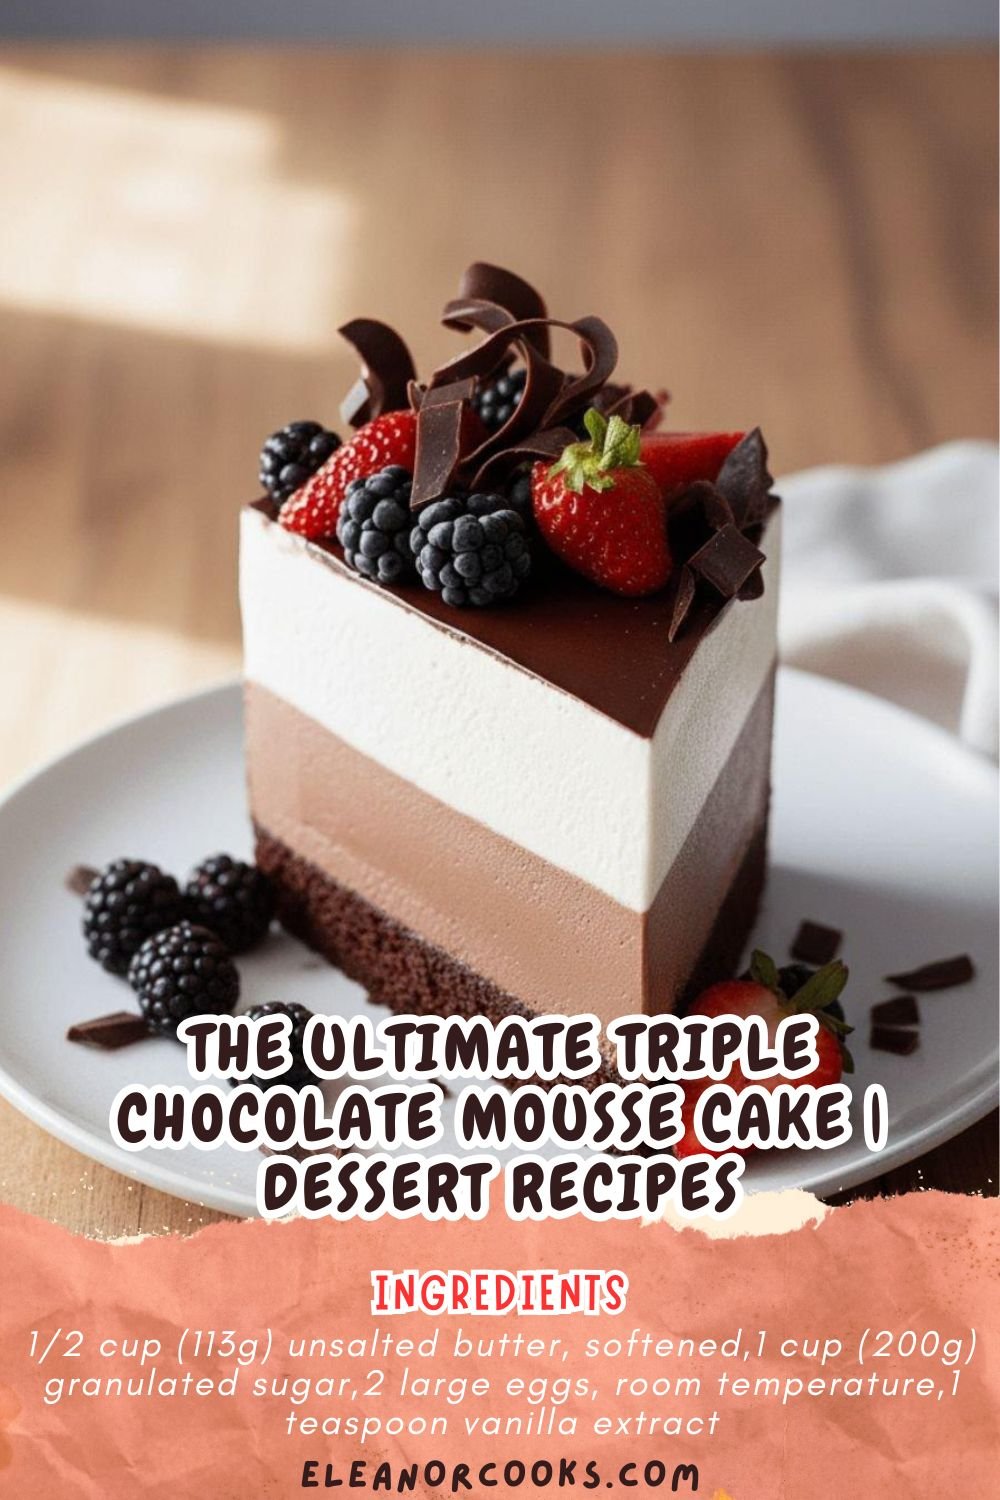
For the White Chocolate Mousse: White chocolate is finicky. You have to melt it low and slow or it seizes up into a grainy mess. Use a good quality bar, not chips. Once melted and slightly cooled, it folds into whipped cream to create the lightest, sweetest top layer. It’s the visual and textural finish the cake needs. Garnish with some chocolate shavings or a few berries, and you’re done.
4) How to Make Triple Chocolate Mousse Cake
Step 1. Bake the cake layer. First, get your oven hot. Grease that springform pan and line the bottom with parchment—trust me, this is non-negotiable for a clean release. Cream your butter and sugar until it’s light and pale. Beat in the eggs one by one, then the vanilla. Mix your dry stuff in a separate bowl. Add the dry and wet ingredients to the butter mix in alternating batches, starting and ending with the dry. Pour it in the pan, smooth the top, and bake until a toothpick comes out clean. Let it cool completely right there in the pan.
Step 2. Make the dark chocolate mousse. Chop your dark chocolate nice and fine. Melt it over a double boiler or in the microwave at half power, stirring often. Let it cool just a bit. Whip one cup of that cold heavy cream with a spoonful of powdered sugar to soft peaks. Stir a big scoop of the cream into the melted chocolate to loosen it up. Now, gently fold in the rest of the cream until you can’t see any white streaks. Pour this over your cooled cake, smooth it, and tap the pan on the counter. Into the fridge it goes for about half an hour to set.
Step 3. Add the milk chocolate layer. Repeat the exact same process with the milk chocolate and another cup of cream. Melt, cool slightly, whip, lighten, and fold. By now you’re a pro at this. Once the dark layer feels a bit firm, pour the milk chocolate mousse over it. Smooth the top, another gentle tap, and back into the fridge for another 30 minutes. Patience is your best tool here.
Step 4. Finish with the white chocolate mousse. Last layer! Be extra gentle melting the white chocolate—it burns if you blink. Same drill: melt, cool, whip cream, fold together. Pour this final, cloud-like layer over the set milk chocolate. Use your spatula to make a pretty, swoopy top. Cover the whole pan loosely with plastic wrap and walk away. Let it chill in the fridge for at least six hours, but overnight is truly best. This is where the magic of setting happens. Knowing how to make a wedding cake involves similar patience, but this is your training ground.
Step 5. Serve and impress. When it’s finally time, run a thin knife around the inside edge of the pan. Unlatch the springform and lift the ring away. If you want perfect slices, warm your knife under hot water and dry it between each cut. Top with chocolate curls or a few raspberries. Then slice, serve, and get ready for the compliments. It’s a dessert recipe that delivers every single time.
5) Tips for Making Triple Chocolate Mousse Cake
Room temperature ingredients matter for the cake. Cold butter doesn’t cream well, and cold eggs can make your batter look curdled. Just pull them out about an hour before you start. For the mousse, however, your cream must be stone-cold. Warm cream won’t whip up into those lovely, stable peaks you need. I sometimes chill my mixing bowl too, just to be sure.
Don’t over-whip the cream. This is the most common misstep. You want soft peaks that hold their shape but still flop over at the tip. If you whip it to stiff peaks, it becomes grainy and hard to fold into the chocolate smoothly. It’s better to under-whip a little than to over-whip. You can always give it another few turns with the whisk if needed.
Fold, don’t stir. When combining the whipped cream and melted chocolate, use a wide rubber spatula. Cut down through the center, scrape along the bottom, and fold the mixture over onto itself. Turn the bowl a quarter turn and repeat. This gentle motion keeps the air in the cream, giving you a light mousse. Stirring aggressively will deflate it and leave you with a dense layer. Think of it as a gentle hug, not a handshake.
6) Making Triple Chocolate Mousse Cake Ahead of Time
This cake is a dream for planners. In fact, I insist you make it ahead of time. It needs that long, overnight chill to set up properly and for the flavors to marry. Trying to serve it after just a few hours is a recipe for a delicious but sloppy mess. Plan to make it the day before your event. Your future, less-stressed self will thank you.
You can even take it a step further. The baked and cooled cake base can be wrapped tightly and frozen for up to a month. Thaw it in the fridge before you start your mousse layers. This breaks the work into two very manageable sessions. It’s the kind of trick that makes hosting feel effortless.
Hold off on the final garnishes. Add any chocolate shavings, curls, or fresh berries right before you serve. This keeps everything looking fresh and prevents the garnishes from getting soggy or bleeding color into that beautiful white top layer. A little last-minute flourish makes all the difference in presentation.
7) Storing Leftover Triple Chocolate Mousse Cake
Leftovers? It happens, I guess. Cover the cut cake tightly with plastic wrap or transfer slices to an airtight container. It will keep beautifully in the refrigerator for up to 4 days. The mousse might firm up a bit more over time, but the flavor will still be incredible.
I don’t recommend leaving it out on the counter for more than an hour or two, especially on a warm day. The mousse is dairy-based and will start to soften and lose its structure. Keep it chilled until the moment you’re ready to eat.
Freezing is possible, but with a caveat. Freeze the whole, undecorated cake or individual slices on a parchment-lined tray until solid, then wrap tightly in plastic and foil. Thaw overnight in the fridge. The texture might be ever so slightly denser, but it’s a great option if you need to keep it longer than a few days. It’s a handy trick if you’re prepping for a big event, like figuring out how to make a smash cake for a birthday party a week in advance.
8) Try these Dessert Recipes next!


9) Triple Chocolate Mousse Cake

Triple Chocolate Mousse Cake: Decadent Dessert Recipes
Ingredients
For the Chocolate Cake Base
- 1/2 cup (113g) unsalted butter, softened
- 1 cup (200g) granulated sugar
- 2 large eggs, room temperature
- 1 teaspoon vanilla extract
- 1/2 cup (120ml) buttermilk
- 1 cup (125g) all-purpose flour
- 1/2 cup (50g) unsweetened cocoa powder, sifted
- 1 teaspoon baking soda
- 1/2 teaspoon salt
For the Dark Chocolate Mousse
- 6 ounces (170g) dark chocolate (60-70%), finely chopped
- 1 1/2 cups (360ml) heavy cream, cold
- 2 tablespoons powdered sugar
For the Milk Chocolate Mousse
- 6 ounces (170g) milk chocolate, finely chopped
- 1 1/2 cups (360ml) heavy cream, cold
- 2 tablespoons powdered sugar
For the White Chocolate Mousse
- 6 ounces (170g) white chocolate, finely chopped (use good quality)
- 1 1/2 cups (360ml) heavy cream, cold
- 2 tablespoons powdered sugar
For Garnish
- Chocolate shavings or curls
- Fresh berries (optional)
Instructions
Make the Cake Base
- Preheat your oven to 350°F (175°C). Grease a 9-inch springform pan and line the bottom with parchment paper.
- Cream the butter and sugar together until light and fluffy. Beat in the eggs, one at a time, then mix in the vanilla.
- In a separate bowl, whisk together the flour, cocoa powder, baking soda, and salt.
- Add about a third of the dry ingredients to the butter mixture and mix until just combined. Pour in half the buttermilk and mix. Repeat, ending with the last third of the dry ingredients. Mix until you don’t see any more flour streaks—don’t overmix!
- Pour the batter into your prepared pan and smooth the top. Bake for 20-25 minutes, or until a toothpick inserted in the center comes out clean.
- Let the cake cool completely in the pan on a wire rack. It’ll shrink a bit—that’s normal!
Make the Dark Chocolate Mousse
- Place the finely chopped dark chocolate in a heatproof bowl. Melt it gently over a pot of simmering water (or in the microwave at 50% power in short bursts), stirring until smooth. Let it cool slightly, but not harden.
- While the chocolate cools, whip 1 cup of the cold heavy cream with 1 tablespoon of powdered sugar until you get soft peaks. Be careful not to over-whip it into butter—we’re not making buttercream!
- Fold about a third of the whipped cream into the melted chocolate to lighten it up. This makes it easier to fold in the rest without deflating everything.
- Gently fold in the remaining whipped cream until no white streaks remain. Try to keep it fluffy.
- Pour the dark chocolate mousse over the cooled cake base in the springform pan. Smooth the top and gently tap the pan on the counter to settle it. Pop it in the fridge for 20-30 minutes to set a bit before adding the next layer.
Make the Milk Chocolate Mousse
- Repeat the exact same process as the dark chocolate mousse: melt the milk chocolate, whip 1 cup of cream with 1 tablespoon of powdered sugar, lighten the chocolate, then fold in the rest.
- Once the dark chocolate layer has firmed up a little, pour the milk chocolate mousse over it. Smooth the top and give it another gentle tap. Back into the fridge for another 20-30 minutes.
Make the White Chocolate Mousse
- Okay, repeat the process one more time for the white chocolate. Pro tip: white chocolate scorches easily, so melt it super gently.
- After the milk chocolate layer has set, pour the white chocolate mousse on as your final layer. Smooth it into a beautiful, cloud-like top.
- Cover the whole pan loosely with plastic wrap and refrigerate for at least 6 hours, but preferably overnight. Patience, I know. It’s worth it.
Serve
- Carefully run a thin knife around the inside edge of the springform pan to loosen the cake. Release the clasp and remove the ring.
- If you want a super clean look, you can warm your knife under hot water, dry it, and slice. Or just go for it.
- Garnish the top with chocolate shavings and maybe a few berries, if you’re feeling fancy. Slice and serve to your very impressed guests.
10) Nutrition
Serving Size: 1 slice, Calories: 580, Total Fat: 42g, Saturated Fat: 26g, Cholesterol: 135mg, Sodium: 220mg, Total Carbohydrates: 45g, Dietary Fiber: 3g, Sugars: 35g, Protein: 7g


Leave a Comment